Michelle's Awesome puzzle tutorial

Welcome to your tutorial on how to put on your bodice!  It's a puzzle, so here is the solution!
Put on the corset. Notice the zipper is intentionally upside down.  This is to avoid needing a hook on top.  it will already be tight on the top when you zip it.
The laces can be done by using every other loop.  So feel free to skip loops in between.  I always do this for extra security in case one of the loops breaks.  If you feel like using all of them on the night of the event, feel free, but for try-ons, it definitely will be faster and easier to skip.
And now you have a beutiful fitted corset with three leeches on the front!

The velcro tabs obviously line up with the ones inside the overlay.  Start with the two on the bust.
Then the one on the right hip.
then readjust the ones on the bust so the overlay lays mostly flat across your front.

wrap around the back.  note the "hill" on the top edge will under the right shoulderblade, not center. (I originally had another detail on the back sticking up, but I removed it because it was too much).

wiggle and adjust and pull tight so it lays flat against the back bodice.

Lift up the bottom of the newspaper, then press the overlay closed.  I found that focusing on the making the top edge lay flat on the bodice rather than lining up the velcro for the final closure was key.  That's why I applied extra long strips to provide more useable surface area.

And now it fits perfectly!


The Basic Basics! Bust/Waist/Hip

This is the bare minimum any designer needs to create clothes that fit you well.  It is important that these measurements are accurate and truthful!  Believe me, I know we all want to be smaller in some places and bigger in others, but if I'm making something that you're going to wear, little white lies can turn into embarassing, ill-fitting, uncomfortable clothing!

I promise, these measurements will be just between you and your designer, so don't hide the truth from me and I'll never hide the truth from you.  Deal?  Let's begin!

Bust:
  Measure around the bust at the fullest part 
with your arms down naturally at your sides.


Waist:
Measure around the smallest part of your waist
with one finger under tape measure.
No need to pull it tight or hold your stomach in.  
Just hold it naturally.


Hips:
Measure around your hips where they are the fullest.
Yes, this includes around your derriere!
Many women, including models, are under the impression
that the hip measurement is simply where the hip bones are.
Not true for tailoring.
I need to know the fullest part in order to make sure
the fit of the garment is not too tight.


And that's it for the easy part!

Usually, for normal clients ordering things online and models that are in the process of being cast, this is all I need.  So if this applies to you, congratulations!  You're done!

If you are a model that I have booked or a Couture Client, I normally like to take your detailed measurements myself.  But if distance prohibits that, please continue to the next set of instructions.

Detailed Measurements: Use for Custom Made Couture Garments and Booked Models

The following posts will give you instructions how to take measurements for a custom-made garment.  It may seem like a lot, but it really should only take 10-15 minutes, I swear!

Now, I know having measurements taken can be a very private and frightening thing, but I highly beg of you, please have a friend help you!!  There are a lot of measurements that are difficult to do on yourself, particularly the ones requiring being taken from the back and down length of legs.

If I cannot be there to do it for you, please have someone that you trust do it for you.  I will be HAPPY be on the phone with you to talk you through, but it is very important that measurements are done correctly and truthfully in order for a custom-made garment to fit you the best that it can without the luxury of having fittings beforehand.  I am confident that if these measurements are taken well, your custom garment will fit you like the fabulous supermodel that you know you are.

What You Need

A tape measure and a length of elastic or string long enough to tie around your waist.

That's it!

The Chart

This is the detailed measurement chart that I would like to be filled out.  Please feel free to print it out or open it in a new window.
There are a lot of terms that may be unfamiliar, but for even those that are, it is never a bad idea to read the posts below that I have put together for you.

Thank you!

The Waist: The Center of the Universe

Waist:
Hold the abdominals in a natural, comfortable manner, and measure around the smallest part of the waist with one finger under the tape measure.

After measurement is taken, tie or pin a small elastic band or a piece of string around the waist to mark where the waist line is.  This mark will be used as a point of reference in many of the measurements to follow.

From the Front: Starting from the Neck

The following measurements will be taken from the front.

Neck:
Measure around the base of neck where it joins the shoulders.

Bust and Bust Point

 Bust: 
Measure around fullest part of bust with arms held naturally down.
Bust Point to Bust Point:

Carefully measure from the center of one bust point to the center of the other.

First Line Front

First Line Front:
When the arms hanging down, you will be able to see a crease line that is formed where the arm meets the shoulder.  This is where the armhole seam goes in a garment.
Measure 1" above the armhole creaseline on the left to 1" above the armhole creaseline on the right.

Shoulder to Bust Point, Shoulder to Waist

Shoulder to Bust Point:
Measure from the side of the neck to the bust point.  You can see from the diagram on the main measurement sheet that this will most likely be a slightly diagonal line.

Shoulder to Waist:
Measure from side of neck, to bust point, and down to waist line.

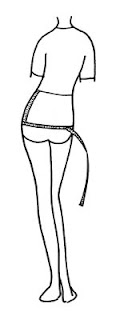
Hip and Hip Point.

Hip:  
Place the tape measure around the hips at the area the measurement is its fullest. On some women this is higher, others, it may be lower, The important part is finding where it is fullest.

Hip Point:
While still holding the tape measure at the hips, place your finger where the tape measure is on the side, release the tape, and then measure from the waist marker to your finger (Hip Point is the distance from the waist to the fullest part of the hip on the side.)

The Back: Shoudler to Shoulder, Back Length, and First Line Back

 Note for the person getting measured:  It is important to just stand up straight and not try to "help" with back measurements by hunching or tilting your head forward as if getting a haircut.  Just stand up nice and straight. Easy!

From the back, feel the "corner" of shoulder.  You should be able to find a pronounced bone sticking out.

Shoulder to shoulder: 
Find the same bone on the other shoulder and measure the length between these two bones.  It is okay if the tape measure looks to be slightly curved as it follows the natural curvature of the back of shoulders.

First Line Back:
Measure about 1" above the armhole creaseline on the left straight across 1" above the armhole creasline on the right.
Back Length:
While standing up straight, you will find a bone sticking out at the base of the neck at the back.  Again, another thing you may have not even known was there.  Measure from this bone to the middle of the Waist marker at the back.

Fron the Side: Shoulder to Elbow, Shoulder to Wrist, Wrist, and Palm

The final set of measurements will be taken from the side.

Shoulder to Elbow:
Remember that bone you found sticking out on your shoulder?  Find that again and place the top end of the tape measure there.  Measure with arm naturally slightly bent down the back of arm to the elbow bone.

Shoulder to wrist: Extend the tape from shoulder, then elbow, down to the wrist bone.

Wrist: Measure around wrist where wrist bones stick out.

Palm: with hand held flat, measure around fullest part of hand.
Bicep:  Measure around fullest part of bicep.

Slacks Length, Waist to Knee, Inseam, and Crotch

Slacks Length:  Measure from your waist marker down to your ankle bone at your side.

Waist to Knee: Measure from your Waist marker to the middle of your knee at the side. You will feel a little, but pretty easy to find, indentation on the side of your leg to indicate that you have reached the knee.
Inseam: Have model hold the top of the tape measure between legs at the crotch (where the seams come together on the legs of your pants) and have assistant measure from that point down to inner ankle bone.


Crotch measurement: Simply subtract inseam measurement from slacks length measurement.

Knee and Leg Opening

The knee is, you guessed it, the measurement around the knee at the kneecap.

For the Leg Opening, point toe and measure around from the front arch of your foot and the back of your heel.

And That's it!

Thank you for taking the time to read this tutorial.  I hope it was easy to understand.  Now that you have your measurements, send them to your designer and then put your own copy away for safe keeping.

If you have any questions or something is not clear, please feel free to contact me at SparkyMac1@gmail.com.  I've been doing this for years and measurements are second nature to me, so if something seems confusing, I would like to know so I can make this page better.

Thank you!

Andrew MacLaine